identities array. A user can have multiple identities associated with various identity providers.
Account linking is the process of linking multiple identities in a single user profile. As a result, users can log into supported identity providers with a single set of credentials instead of creating a separate user account for each identity provider. To learn more, read Account linking.
In Client-initiated account linking, the client initiates the account linking request to Auth0 on the user’s behalf. When the client attempts to access an external provider’s API that the user has not granted access to, Auth0 returns a response that it cannot find the access token for that service, triggering the account linking flow.
Prerequisites
Before getting started, make sure you have completed the following steps:1
Create an Auth0 Account
To continue with this quickstart, you need to have an Auth0 account.
2
Create an Auth0 Application
Go to your Auth0 Dashboard to create a new Auth0 Application.
- Navigate to Applications > Applications in the left sidebar.
- Click the Create Application button in the top right.
- In the pop-up select Regular Web Applications and click Create.
- Once the Application is created, switch to the Settings tab.
- Copy the Domain from the Basic Information section to your clipboard.
- Scroll down to the Application URIs section.
- Set Allowed Callback URLs as:
https://AUTH0_DOMAIN/continue - Click Save in the bottom right to save your changes.
3
Enable your Application to use the Auth0 Management API
Now switch to the APIs tab and enable the toggle next to the Auth0 Management API.
Next, click the expand arrow to the right of the toggle to view the permissions. Use the filter to find and select the
Next, click the expand arrow to the right of the toggle to view the permissions. Use the filter to find and select the
create:users and update:users permissions and click Update to save the changes.4
Create an Auth0 Action for Account Linking
To enable account linking, you need to create an Auth0 Action. This Action will handle the account linking process when the user logs in.Click Save Draft
- Go to Actions > Library in the Auth0 Dashboard.
- Click Create Action > Create Custom Action.
- Name the Action
account-linkingand select the Post Login trigger. - Copy and paste the following code into the Action code editor:
Account Linking Action Code
5
Set Secrets and Dependencies for your Auth0 Action
Open Applications > Applications in the left sidebar in a new tab by right clicking and selecting to open in a new tab. Select your Account Linking App from the list, and navigate to the Settings tab. You will need to copy the settings from here in the following steps. Switch back to the Actions code editor, and on the left side switch to the Secrets tab (represented with a key icon) and click Add Secret to add the following required secrets:
In the Actions code editor on the left side switch to the Dependencies tab (represented with a package icon) and click Add Dependency to add the following dependencies:
Finally, click Save Draft to save the Action. Once the Action is saved, click Deploy to make the Action available for use.
AUTH0_DOMAIN: Copy from the Account Linking App settings.AUTH0_CLIENT_ID: Copy from the Account Linking App settings.AUTH0_CLIENT_SECRET: Copy from the Account Linking App settings.ACTION_SECRET: Open a terminal and runuuidgento generate a secret that is unique to this application and copy it here.
In the Actions code editor on the left side switch to the Dependencies tab (represented with a package icon) and click Add Dependency to add the following dependencies:
- Name:
auth0, Version:4.21.0 - Name:
openid-client, Version:6.3.4 - Name:
jose, Version:6.0.10 - Name:
@panva/hkdf, Version:1.2.1 - Name:
debug, Version:4.4.0
Finally, click Save Draft to save the Action. Once the Action is saved, click Deploy to make the Action available for use.
6
Attach your Auth0 Action to the Post Login Trigger
In the Dashboard, navigate to Actions > Triggers and click on the post-login trigger. From the Add Action side panel on the right side, select the account-linking Action and drag it into your flow between Start and Complete. If you have other Actions, make sure it is the first Action in the flow. If you do not see the Action listed, try refreshing the page.

Click Apply to save the trigger.
Click Apply to save the trigger.
How it works
Let’s walk through a real-world example: After authenticating via Auth0 using Passkeys, a user asks an AI agent integrated with a productivity app to fetch Google Calendar events:- The application calls the Agent API with an Auth0 access token and the user input “Get Google Calendar events for today and tomorrow.”
- The Agent API uses an Auth0 access token to call Auth0 and requests a Google access token with the Calendar scopes.
- Auth0 looks for a Google access token with the requested Calendar scopes in the secure Token Vault. Because the user has not authorized access to the Google Calendar API, Auth0 returns a
tokenset_not_foundresponse. - The Agent API returns this response to the application, which initiates an account linking request to Auth0.
- When the user authorizes access to the Google Calendar API, they also authorize Auth0 to perform the account linking flow.
- Auth0 then uses the Google access token to call the Google Calendar API and complete the operation.
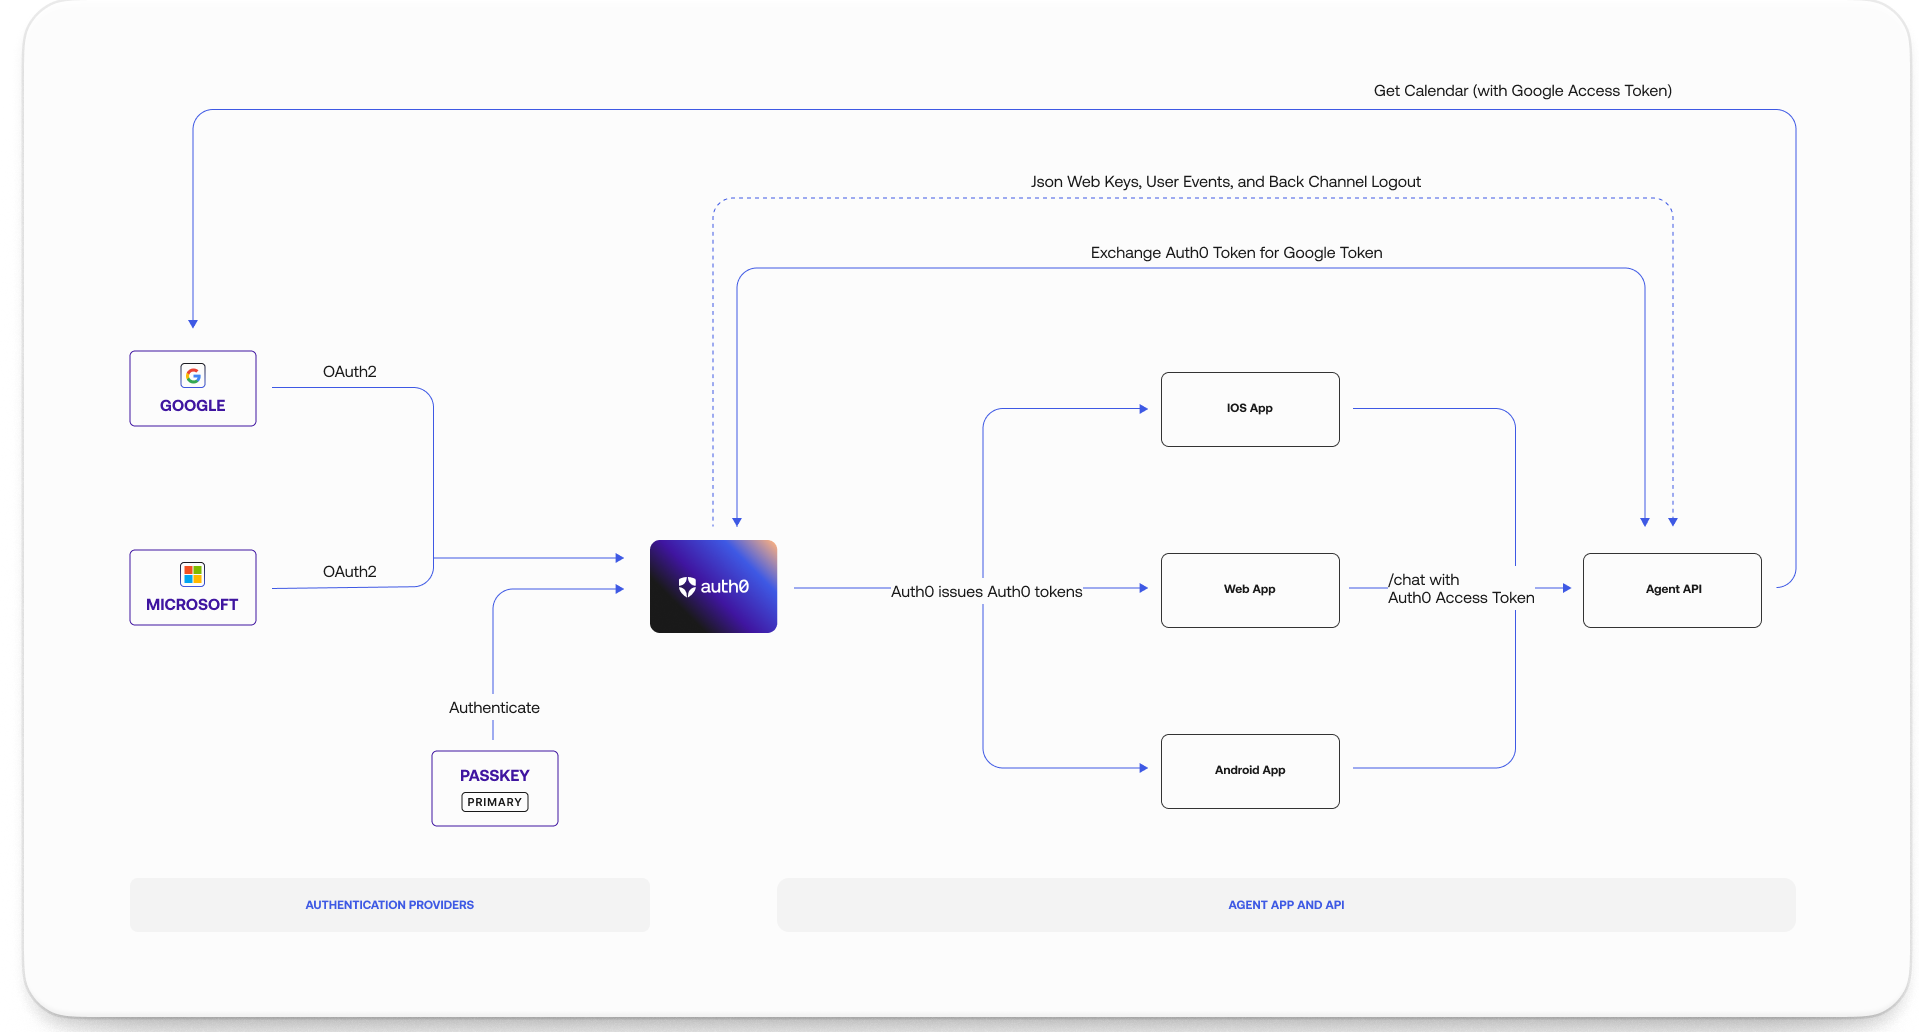
/authorize, the Client-Initiated Account Linking post-login Action checks for the link_account scope and attempts to link the requested user account (secondary account) with their existing logged in account (primary account). In our example, the user’s Auth0 account is the primary account and the user’s Google account is the secondary account.
Link user accounts
To link user accounts, generate an authorize URL and pass the
When the account linking flow has been triggered:
link_account scope along with the following parameters:| Parameter | Description |
|---|---|
scope | Set to link_account to link accounts. |
requested_connection | The name of the connection you want to link accounts with. |
requested_connection_scope | The requested connection’s scopes. |
id_token_hint | The ID token issued for the primary user. |
- The Action checks if the user has a linked account for the requested connection by searching the user profile’s
identitiesarray. If a linked account for the requested connection already exists, the Action exits the account linking flow. - The Action validates the ID token passed to
id_token_hintby verifying that itssubclaim matches the session’s user ID. Note that the ID token shouldn’t be older than the expiration defined in theexpclaim. - After the Action determines that the currently logged-in user is the same user Auth0 is requesting account linking for, Auth0 validates that the user has access to the requested connection.
- The user authenticates with the requested connection by logging into their secondary account. If the secondary account requires MFA, the user authenticates with the configured MFA factor.
- Auth0 redirects back to the Action with the ID token from the secondary account authentication.
- After the Action validates the ID token, it uses Auth0 SDKs to link accounts into a single user profile. The secondary account is added to the user profile’s
identitiesarray. - The Action sets the user ID back to that of the primary account. The user account linking flow completes and redirects the user back to your application.
Unlink accounts
To unlink accounts, use the Management API to call the Unlink a user account endpoint. To learn more, read Unlink user accounts.Learn more
- Learn more about how to link user accounts in Auth0.
- Learn more about how to unlink user accounts in Auth0.